

An Introduction to Composting Methods
From Bokashi to Johnson-Su, biodynamics to vermicast – compost can be confusing. Cutting through the muck, here's our beginners guide to help you find the right method for you.
From Bokashi to Johnson-Su, biodynamics to vermicast – compost can be confusing. Cutting through the muck, here's our beginners guide to help find the right method for you.
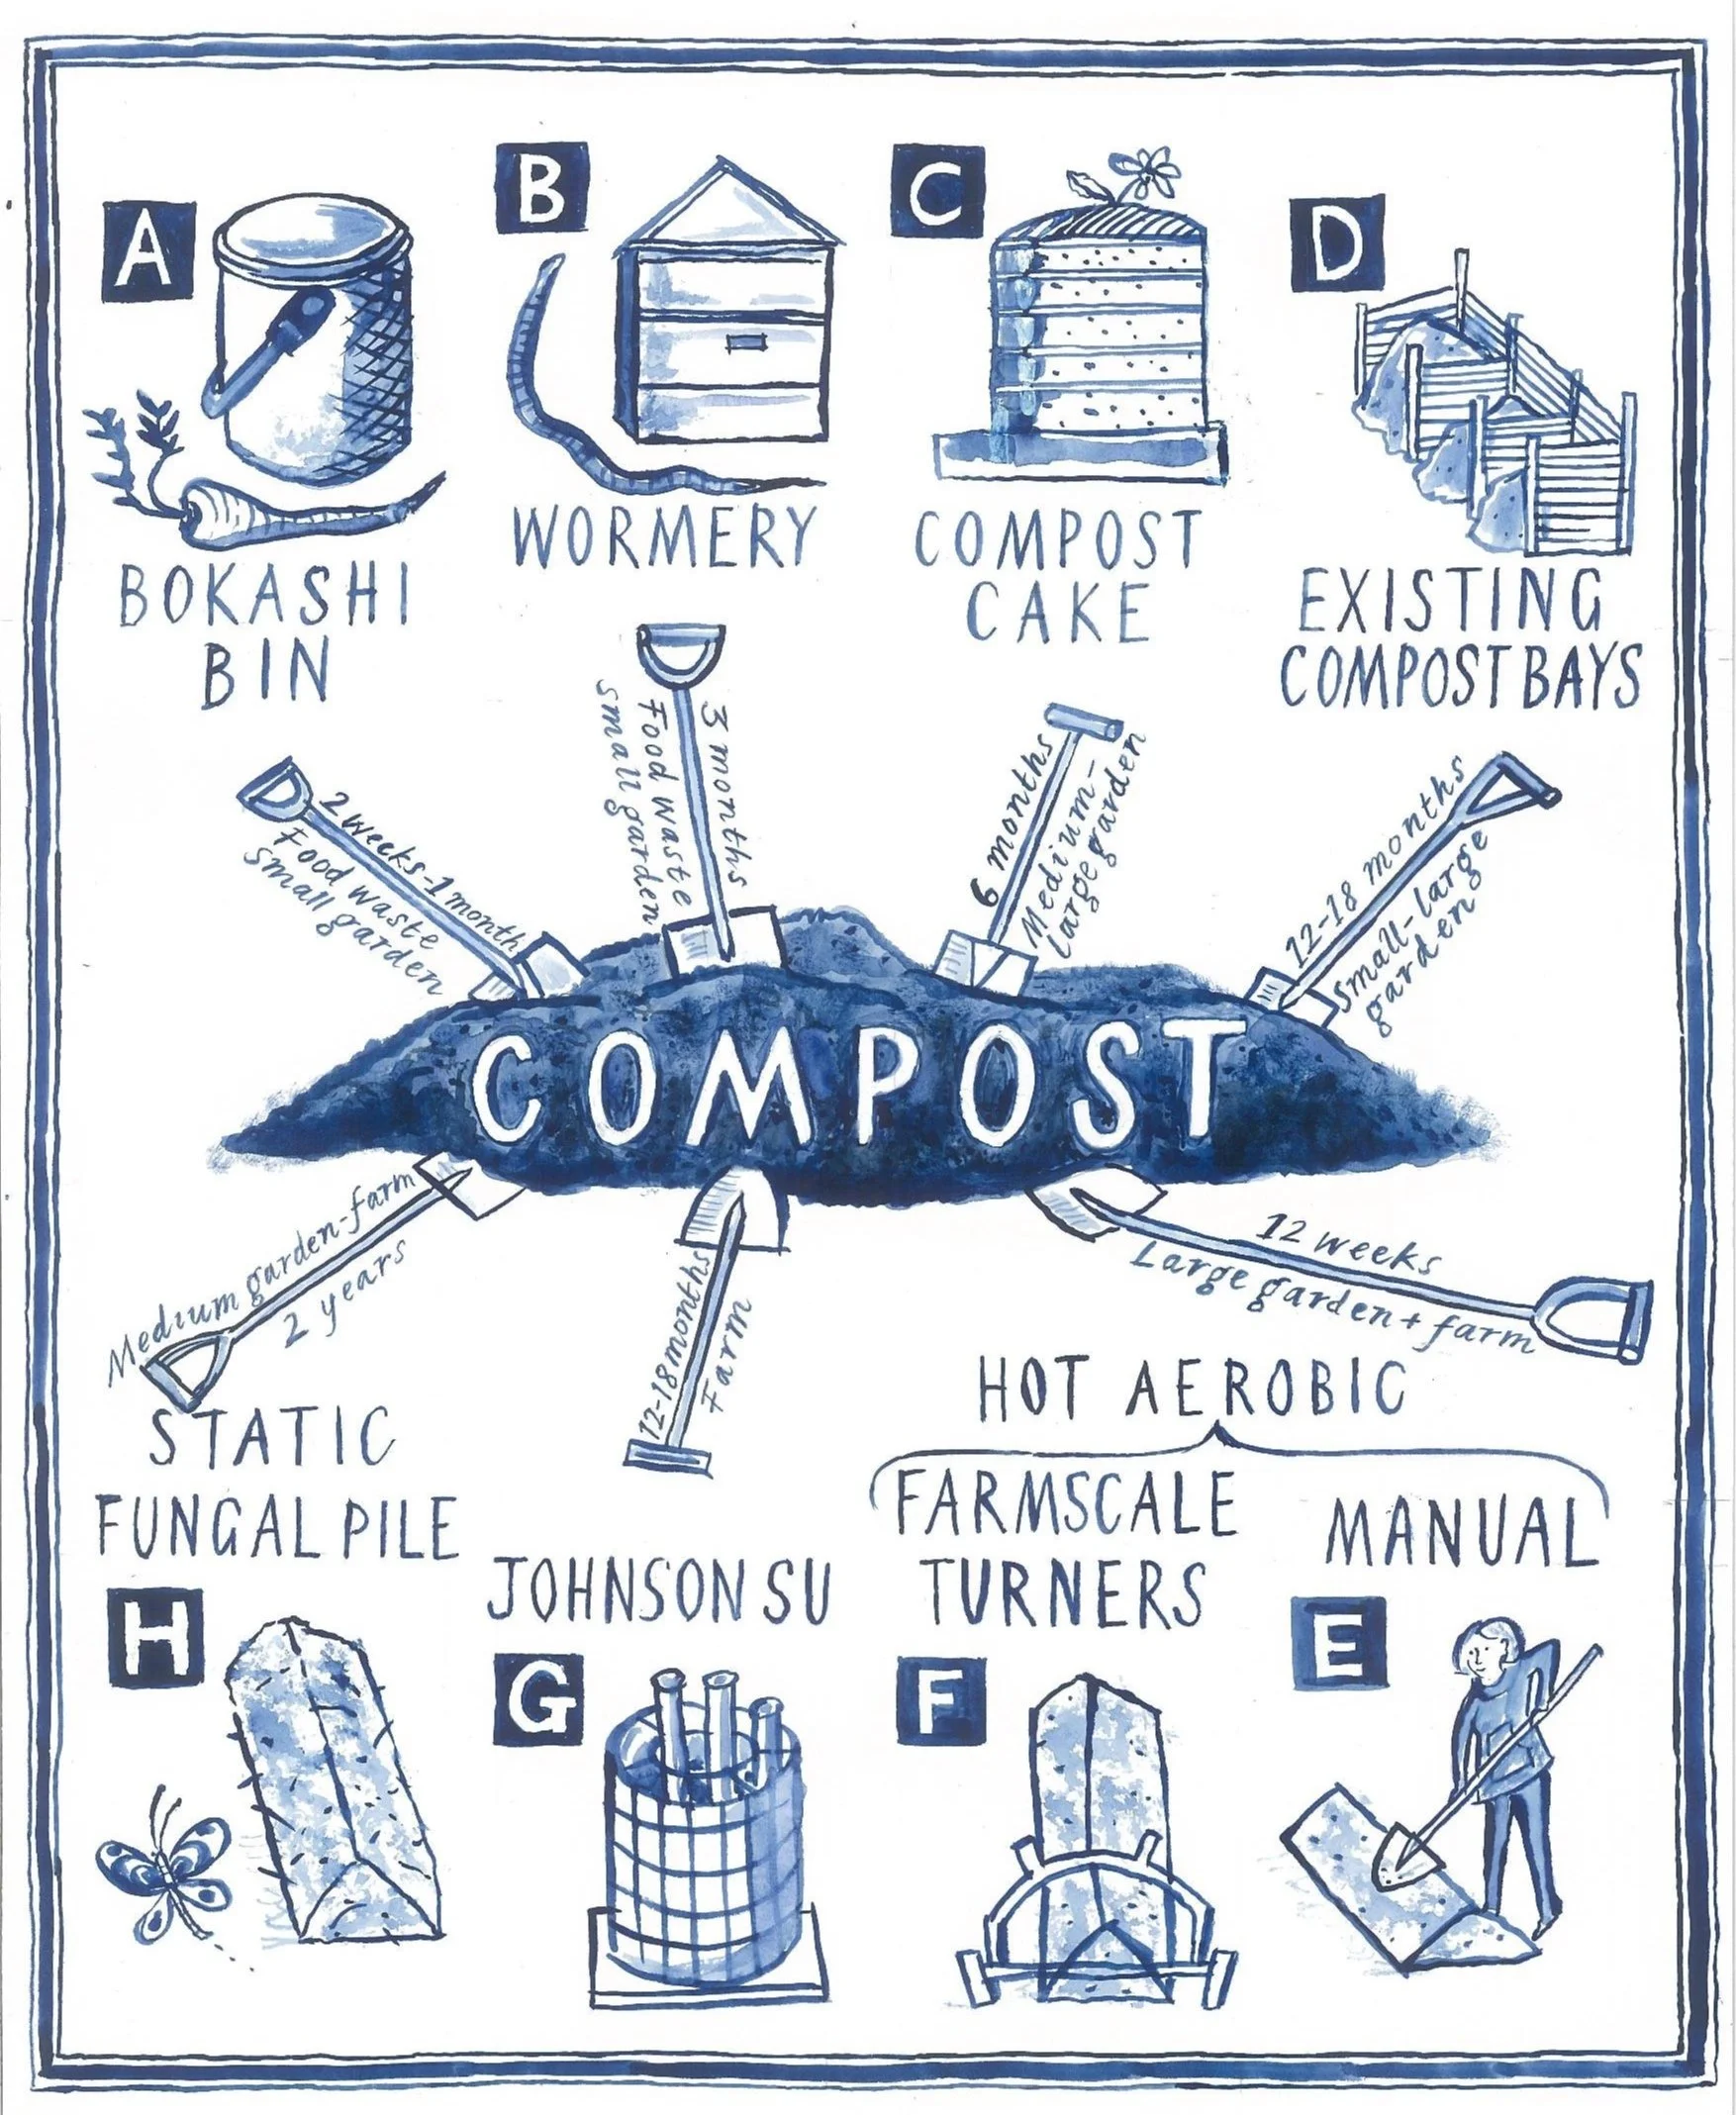
BOKASHI
EQUIPMENT
A bokashi bucket – a bin with a tight-fitting lid
A bag of inoculated bokashi bran
Kitchen waste
Bokashi is a way of breaking down your kitchen waste through fermentation rather than composting. Unlike aerobic composting it can deal with meat and dairy, and is an anerobic process (i.e. requiring an absence of oxygen) that relies on inoculated bran to ferment the waste. The bran is inoculated with beneficial microbes (or EM - Effective Micro-organisms) that proliferate in anaerobic, acid conditions, similar to the active organisms in yoghurt. You can make the bokashi bran at home (Korean farmers have been collecting and culturing these naturally occurring micro-organisms for centuries) or buy it online.
METHOD
Place your kitchen waste in the bucket, press down and cover with a handful of bran. Repeat each time you add waste.
When the bucket is full, seal it shut and leave it for 2 to 3 weeks to pickle. After 2 to 3 weeks you can bury the Bokashi directly into a fallow spot in your garden as long as it is not near any plant roots. As the Bokashi has fermented the food and neutralised any smells, it should no longer attract vermin when put into your compost.
Alternatively, ‘finish off’ the pickled waste in a wormery (if you have space) or in a Compost Cake. The anaerobic process of the Bokashi bin followed by the aerobic process in the wormery, or your compost, combine to get the most nutrients out of your food waste.
WORMERY
EQUIPMENT
Worm composter – we like a tray wormery
Worm food
Worm bedding
Compost worms (Eisenia fetida - also known as brandling, manure, tiger or red worms).
This type of worm is ideal for converting your kitchen waste into nutrients. Their worm castings, ‘vermicast’, contain a diverse community of microbes which benefit the soil. Unlike earthworms which are soil dwellers, composting worms live in decaying organic matter.
METHOD
Keep your wormery in a shed or sheltered place in your garden (worms like warm, moist conditions). Place a layer of bedding in one tray; compost is perfect. Add the composting worms and cover with food waste, meat, paper, cardboard, tea bags, flowers or leaves.
Avoid dairy, spicy food, grass cuttings and chicken manure. Thereafter add small amounts of waste regularly to feed the worms.
As the worms are surface dwellers they will eat the waste and then move upwards towards the next tray, allowing you to remove the vermicast from the bottom tray. They will survive for up to four weeks without fresh food so you can go on holiday!
TOP TIP: We advise NOT using the liquid which drains off your wormery. As Nicole Masters says ‘This liquid is a combination of the undecomposed food wastes, dribbling through the worm castings. It can contain diseases and nitrates. The production of liquid is telling you that your worm bed is bacterially dominated, and more carbon-rich materials are needed, such as cardboard and wood chips. Good quality commercially available worm tea extracts (vermiliquid) are extracted by flushing water though the finished vermicast. The chocolate colour in vermiliquid is the humic substances and the golden colour is due to fulvic acid – both essential bio-stimulants and plant health promotants.’
BIODYNAMICS
Biodynamics is a philosophy and an approach to growing. Struck by the damaging route that agriculture was taking, in 1924 Rudolf Steiner launched his Agriculture Course in which he warned against the widespread use of chemical fertilisers, the decline of soil, plant and animal health and the subsequent devitalisation of food. His recommendations formed the basis of the biodynamic method which recognised the interplay of cosmic and earthly influences on the earth.
Jane Scotter grows biodynamically on her farm Fern Verrow in Wales, producing incredible produce for Skye Gyngell’s restaurant Spring in London. As Jane says ‘it gives clarity and understanding of things that are greater than ourselves. It connects you to the unseen forces that work with the polarity of the earth and the planets and the moon. It’s about feel, instinct and intuition’.
We grow biodynamically as often as we can, following the Maria Thun calendar. Observing the lunar effect on plants, Maria divided them into fruit, root, leaf and flowering groups and indicated days for sowing and planting each of them. We also use biodynamic preparations in the garden and compost preparations when we make our Compost Cakes. It seems airy fairy but as Jane say ‘Biodynamics is magic. Not airy fairy silly magic. It is very real’. The more you grow biodynamically the more you feel connected to the seasons, to the rhythms of the earth. And the produce that is grown in this way is undeniably better tasting, healthier and has longer shelf life. You can feel the life force within it.’
BIODYNAMIC PREPARATIONS
There are 9 biodynamic preparations that act like healing remedies for the earth. You can make your own preparations or you can order them through the Biodynamic Association. See Resources for biodynamic books on how to make these preparations and useful websites. We love 500 and 501.
Horn Manure 500: made from cow-manure filled horns buried in September and left in the ground over winter. Spray in the evening or on a cloudy day in spring to bring heat and light forces to pull roots down to give plants a solid foundation.
Horn Silica 501: made from silica-filled horns buried over the summer and stored throughout winter: Spray early on a sunny morning in spring and through the growing season to encourage your plants to stretch upwards like the rising sun and develop their shoots, leaves, flowers and fruits.
COMPOST PREPARATIONS
We use these preparations in our Compost Cakes: Yarrow 502, Chamomile 503, Nettle 504, Oak bark 505 and Dandelion 506 and the liquid Valerian 507.
METHOD
When you have finished your Compost Cake make 5 little balls of clay (you can buy bentonite clay or you may have an area of clay in your garden). Push your finger into one of them and put a pinch of one of the (non-liquid) compost preparations inside it.
Repeat for the other 5 preparations. Place these balls spaced out into 5 holes on the top of your Compost Cake. Pour half the liquid preparation Valerian 507 into a hole in the middle of the cake and then spray the other half over it to mobilise the phosphateactivating bacteria in the pile.
Using Valerian 507: As we allow beautiful, sweet, vanilla-scented valerian flowers to seed freely around the garden, we often make this preparation. Pick the flowers when half open, mix them with water and hang in a bottle from a tree for 3 days. Strain, pour back into the bottle and cork. We use this preparation in spring, spraying it onto plants to protect them against frost and pouring into our Compost Cakes and onto the soil to mobilise phosphate-activating bacteria.
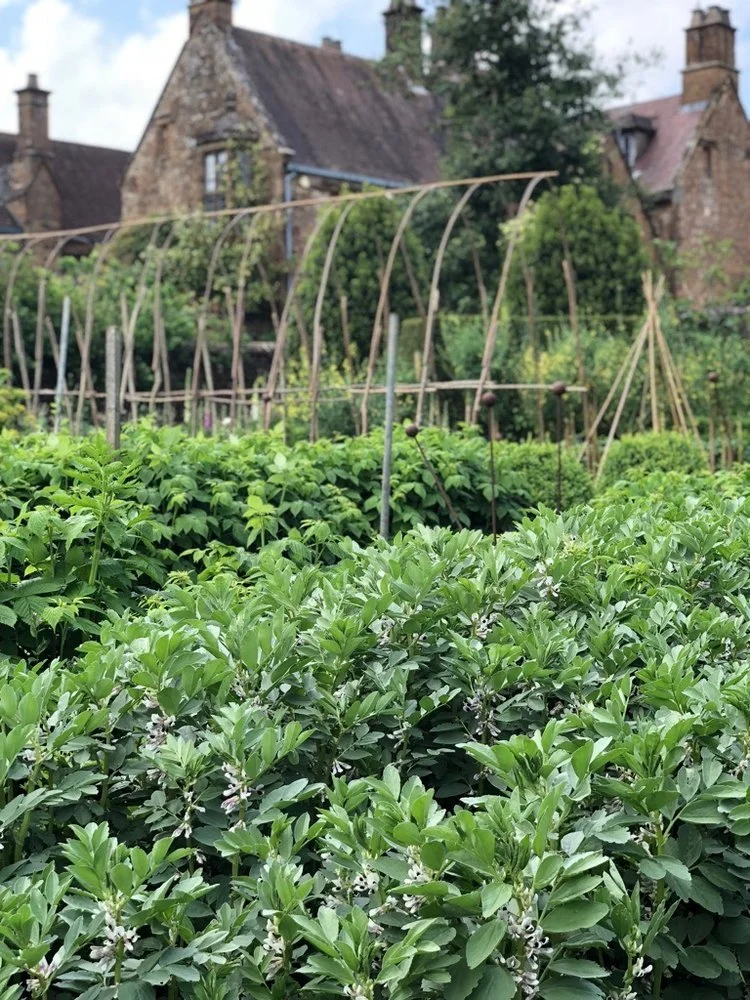
COMPOST BAYS
EQUIPMENT
Ideally 3 or more bays (untreated slatted or solid wood), 1.2m to 1.7m cubed, sitting on soil
Compost or turkey thermometer
Toptex semi-permeable membrane
AS A PANTRY
We use our timber compost bays as a pantry for our Compost Cakes, storing carbon in one bay and nitrogen in another as we gather them until we make our cake. It is important to add layers of fibrous carbon between the nitrogen if we are keeping it for any length of time to stop it putrfiying. For example grass clippings can become a putrified pile of sludge all too quickly so we add layers of autumn leaves, straw, twiggy materials or even cardboard on top of them each time we mow and add them to the pile. We use our third bay for excess turf we have rolled up, clay under a tarpaulin or biochar. When we come to make our Compost Cake all the ingredients are ready and on hand.
TO MAKE COMPOST
Follow the same principles as the Compost Cake to make compost in your existing bays over time.
Start by layering a good depth (30cm) of fibrous carbon at the bottom of the bay and then as you gather greens from your garden or mow the lawn add them to the pile when they are as fresh as possible. These nitrogenous greens fire up the pile but make sure the green layer is no more than 15cm deep otherwise this will become a putrified, anerobic layer.
At this stage, add a layer of carbon such as old hay, leaves, straw, hedge clippings or even cardboard before you add your next layer of nitrogen. We aim for our carbon layer to be two to three times as deep as the layer of nitrogen. To keep the pile moist, water your carbon with a hose as you add it to the pile.
Cover with a layer of toptex to stop it from becoming too wet but still allow it to breathe.
Remember you are trying to ensure there is sufficient temperature, plenty of air and water in the pile. Keep a thermometer in the pile. If the temperature goes over 65 degrees celsius turn it or open up the pile to cool it down.
When the bay is full, turn the pile with a strong fork into a neighbouring timber bay, mixing and watering well and leave for another few months.
When your compost is brown and friable, after approximately 12 to 18 months, it is ready to use in the garden.
JOHNSON-SU BIOREACTOR
A Johnson-Su bioreactor is a method of creating fungal-rich compost developed by molecular biologist Dr Johnson and his wife Hui-Chun Su.
Consisting of a simple barrel of netting filled with dried manure, leaf litter and woodchip with a series of pipes to aid airflow and regular watering, this method produces
microbially rich compost after one year.
STATIC FUNGAL PILE
If you have an abundance of older woodchip you can make it into windrow (Toblerone-shaped pile), water it and then leave it uncovered for 18 months to produce a high-fungal compost. Ideally turn the pile every three months. To learn more about this method see Iain Tolhurst’s website.
HOT AEROBIC COMPOSTING
Hot aerobic composting is a method of producing compost quickly in 8 to 12 weeks. It can either be done manually or with a turner on a farmscale. For those of you happy to make a windrow (Toblerone shaped pile), measure it, and turn it regularly for two weeks, this method is for you.
EQUIPMENT
Compost or turkey thermometer
Inoculum in the form of old compost, Climate Compost or biodynamic preparations
Toptex
Find an area which has a gentle slope in the direction of the length of your windrow to allow rainwater to run off with a stable base (eg. brick, compacted gravel or concrete are best) and protection from the wind.
Start building your windrow (or Toblerone) in layers like a lasagne. You are aiming for a pile 1 to 1.2m high x 1.2m wide and as long as you can manage. We suggest starting with a windrow approximately 2 to 3m long.
Start layering carbon and nitrogen alternately, aiming for a ratio of 3 parts carbon to one part nitrogen.
Innoculate the windrow by adding a bucket of old microbial compost in water or add biodynamic preparations.
Finally add 10% of clay or loamy soil. You can also add layers of seaweed, minerals and bokashi.
Blend the windrow by working along it, turning all the materials in order to mix them up and‘ fluffing’ them with a fork as you go to incorporate air. Keep adding plenty of water as you go. You don’t want it dripping wet, but the heap should always contain about 55 to 60% moisture.
Cover it with a compost fleece such as toptex to protect it from becoming too wet or drying out but allowing it to breathe.
Measure the temperature with a digital thermometer. The windrow must reach 58 degrees celsius for several days (approx. 10 days) in order to kill any pathogens. You may need to add nitrogen if it is not heating up (ideally freshly cut grass clippings).
Turn the pile if it reaches 65 degrees celsius (as beneficial microbial life can only tolerate up to this temperature), adding water as you turn to ensurethe windrow remains moist. You are likely to turn every one to two days during the first week to 10 days, then trailing off as the temperature lowers.
As the windrow cools down there is no need to turn it. When the temperature of the pile reaches ambient temperature and looks and feels fully digested (approximately after 6 to 8 weeks) your compost will be ready to use.

Why farmers should Pitch-Up!
How farmers and sustainable enterprises are coming together to make more from the land


What is “Pitch-Up!”?
Pitch-Up! is a collaborative project that aims to match regenerative enterprises with farmers who want to bring more diversity to their land.
Regenerative enterprises could include sustainable food, farming or business ideas, and the benefits of partnering with like-minded estates include access to land, raw materials, equipment, expertise, use of by-products and retail and production space
In return, farmers can expand their own local community, diversify their businesses, increase their visibility, improve their soil and have front-line access to material innovations, enabling them to tap into opportunities on their land that they don’t currently have the time or mental capacity to explore.
According to founder Tim May and the Pitch Up! Team, the project “is all about abundance, enabling farmers to discover and try new ideas.”
In addition, Pitch Up! connects farmers with other estate managers who have similar visions and provides access to a team of marketing and PR experts.
Where it’s worked
Successful farm partnerships have included bakers, beekeepers, brewers and cheesemongers.
One example is Monch, a sustainable pet food brand that received mentoring from Tim May and the Pitch Up! Team. Co-founders Daisy and Dan forage ingredients from Kingsclere’s organic land (eg chicory, dandelion, willow), air dry them on site and send them off all over the UK. Careful picking of leaves from the hedgerows and herbal leys (planted as part of a long-term soil regeneration on the farm) encourages more growth, supports biodiversity and eliminates waste.
What level of control do farms have in the partnership process?
“Partner farms have a great deal of autonomy in the matching process. They sign up for one season at a time, and during the month of November they receive applications from businesses looking to make the most of the opportunities and raw materials on their land.”
“There is then a shortlisting process where farms and businesses meet to work out the best way for collaborating.”
Getting Involved
This year the land available under Pitch-Up! farms has risen to 12,000 acres and spans from Scotland to Cornwall.
Existing farm partners include Rosuick Organic Farm in south Cornwall, the family-owned Weston Estate in Hertfordshire, Planton Farm in Shropshire and Balcaskie Estate in the heart of East Neuk of Fife.
To find out more about becoming a Pitch-Up! farm partner or business applicant click here.
Business applications open annually in November for a 4-week window.
Follow Pitch Up! On Instagram or Substack to be the first to hear about new opportunities.
By Kate Balding

How to Test Your Soils
Five handy soil health tests to help you keep an eye on your land.
Five handy soil heath tests to help you keep an eye on your land.
While soil health can seem like a tricky thing to master, there are a number of quick and easy tests you can do in your garden or on your farm to check-in with the quality of your soil.
Some of these can be done with the help of apps - with Nicole Masters and Abby Rose from Soilmentor collaborating to make easy-to-use benchmarks for testing and monitoring soils in their Soilmentor Regen Platform.
For those of you happy to do things the old fashioined way though, here are a few we practise regularly.
EARTHWORM COUNT TEST

Count earthworms in early autumn or late spring. Dig a hole of 20 x 20 x 20cm. Place dug up soil on a tray. Count the number of earthworms you have and try to identify if they are leaf-litter, top-soil of deep earthworms (Soilmentor has identification photos).
Put all your earthworms back into the hole. Regularly redo these tests over time to see if the number of earthworms increase.
SLAKE TEST

Spade
Small bags to carry soil samples and a marker pen for labelling bags
Sieve
Cold water
Stopwatch
Put your spade in the ground to a depth of 20cm and dig up soil. Gently break it apart to find a fist-size sample of soil and place inside a bag. Then select 1-3mm sized lumps of soil from the bag and leave them to dry overnight (or for longer if they are very wet as they must be completely dry before testing). When dry, place the pieces of soil on the sieve and fully immerse into the water until it reaches the lip of the sieve. Start timer for 5 minutes and observe. Take photos for your records. The behaviour of the soil will give you an indication of how healthy your soil is:
Poor: If the soil dissolves into single grains, the lump collapses completely or if the water is cloudy.
Better: If the soil breaks into angular pieces or stays mainly intact with slight crumbly edges.
Best: If the lump stays intact and the water is clear this indicates that your soil is humifying and is resistant to erosion.
RHIZOSHEATH TEST
Dig out a spade of soil beneath plants (20cm x 20cm). Break soil away from roots lightly and shake gently so any loose soil falls away.
Observe if the soil stays attached to the roots. If your soil is in good condition the coatings of soil particles will cling to the plant roots, making them brown instead of white. This shows there is biological/microbial activity in the root zone (rhizosphere) where the soil particles (rhizosheaths) are bound to the roots by biotic glues, secreted by micro-organisms. The soil is aggregating and indicates good soil structure. Note that brassicas, alliums, and asparagus do not form rhizosheaths.
BRIX


Refractometer
Garlic crusher
Dry cloth or kitchen roll
Brix measures the light refracting through dissolved sugars which gives an indication of the nutrient density levels of a plant based on the presence of a diversity of simple and complex sugars in the sap.
Pick a few leaves from a plant and squash them into a garlic crusher. Hold the refractometer in one hand, flip back the plastic flap to expose the glass face. Squeeze one drop of juice from the garlic crusher onto the glass. Then drop the plastic flap on top of the drop of juice so it spreads across the screen. Hold the refractometer up to the sky and look into the lens. Record the number on the scale where the line changes from light blue below to dark blue above and observe how fuzzy the line is.
Clean and dry the glass screen and the garlic crusher. You are aiming for a brix score of over 12 and a fuzzy (not clean, sharp) line. This means you have a nutrient
and mineral dense plant with a longer shelf life. Brix scores are particularly useful as a comparison of the nutrients in your plants over time. If you are taking comparison brix tests always take them at the same time of day.
ALBRECHT TEST

For those who want a more in-depth knowledge of your soil we recommend an Albrecht test which needs to be carried out in alaboratory. Developed by William Albrecht at Missouri University in the 1930s, this test places great emphasis on the development of soil biological activity and improving the availability of nutrients. It is underpinned by the idea that the ratio or balance of nutrients is essential to proper plant nutrition. Ian Robertson at SSM Soil Management offers a range of soil assessments.

Our Journey to Farm-scale Climate Compost
Follow Henrietta and Bridget’s journey as they explore farm-scale transitions from chemical fertilisers to microbial composts.
Having seen our plants grow stronger and healthier at a horticultural level the next step was to take it on farm. The challenge here was how to scale it so that we could feed large areas of land with microbial compost rather than chemical fertiliser. We also wanted to provide a solution for those that were not able to compost themselves by providing them with small bags of compost inoculum to grow more nutrient dense food and sequester carbon.
We started on farms local to Wardington where farmers Charles Buckley and George Page patiently let us dive into the unknown and start the process of making compost on a larger scale. Using an Avant and Gujer turner, we created long windrows of compost which matured in 6 to 8 weeks, were non-polluting and could fit into existing farm cycles.
Essentially, we layer up low windrows of carbon, nitrogen, fresh greens, finished compost, clay and water. All ingredients are organic, have no toxic, broadleaf spray aminopyralid and we ensure that all farmyard manure comes from animals fed wit no GM. We measure the windrows daily, regulating temperature, oxygen levels and moisture to ensure the best conditions for the proliferation of the microlife.
Our aim is to make a compost toolkit for farmers and growers. Many mistakes were made but we were determined that we made these rather than farmers. There are no second chances on busy, cash-conscious farms where banks and bottom-lines make decisions.
George would often swing by in his pick-up truck to check on progress, with a big smile and always willing to help–but not convinced this was any better than directly spreading farmyard manure (FYM) onto fields.


Our next stop in May 2021 was an unused dairy at Althorp, in Northamptonshire where we began testing Climate Compost on a 260 acre trial farm on the estate, and at Erth Barton in Cornwall guided by regenerative farmer, Tim Williams. At Althorp we began trials in autumn: we inoculated seeds with Climate Compost, then direct drilled 30 way multi-species grass and herbal leys with Climate Compost (both 5kg and 10kg CC per hectare), using a local contractor.
We muck-spread 15 tonnes of FYM per hectare comparing it with 5 tonnes of Climate Compost. Our initial results were quicker germination, stronger root growth and higher worm count (worms increased 10 times with CC compared to 3 times with FYM).
Looking Ahead
We are now partnering with The Organic Research Centre on the Feed The Soil Project, carrying out on-farm trials of how to feed the soil without chemicals. This will include looking at the practicalities and benefits of composting, bokashi, vermicast, johnson-su, biodynamics and microbes.

Climate Compost: The Film
Featuring: Nicole Masters, Merlin Sheldrake, Zach Bush MD, Rattan Lal, Angelika Luebke & more.
Featuring: Nicole Masters, Merlin Sheldrake, Zach Bush MD, Rattan Lal, Angelika Luebke & more.
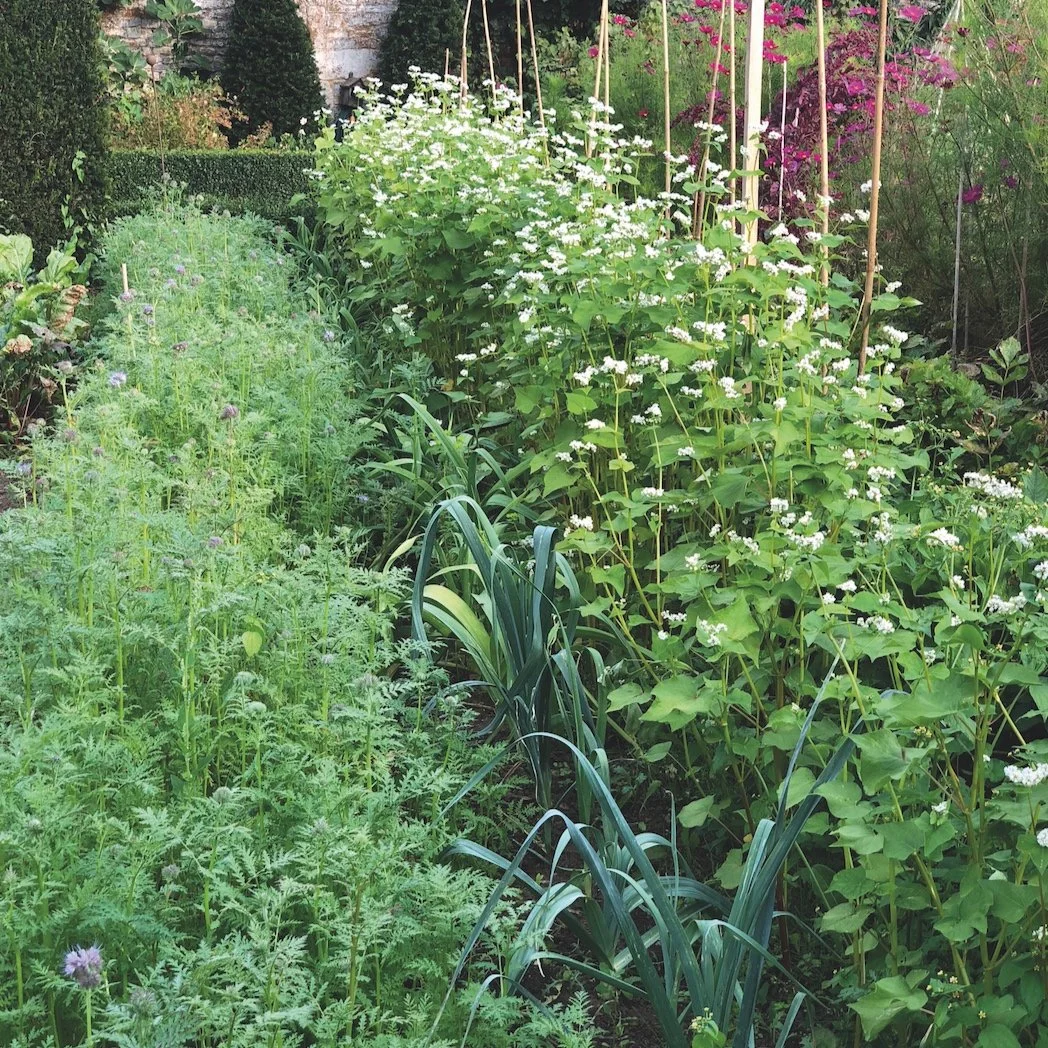
A Guide to Green Manures
Perfect for opening up compacted soils, releasing minerals, supporting biodiversity and suppressing weeds, green manures are a powerhouse for soil health.
Perfect for opening up compacted soils, releasing minerals, supporting biodiversity and suppressing weeds, green manures are a powerhouse for soil health.
We sow green manures throughout the year. They are brilliant infills for bare patches of earth; remember you always want plants growing in the soil to keep the photosynthesis machine working. They also benefit the health of the soil, opening up compacted soil, releasing minerals to the plant or fixing nitrogen and they are good weed suppressors.
We choose a variety of green manures depending on the time of year, how long we need them to grow for and how we want to help our soils. Our favourite green manures are alfalfa, buckwheat, crimson clover, fenugreen, fodder radish, forage rye, mustard, phacelia, white clover, winter tares(vetch) and yellow trefoil.
For varieties and their properties see our book ‘The Land Gardeners Cut Flowers’.
TOP TIP: Be aware that buckwheat, forage rye, vetch and black mustard inhibit the growth of seeds (allelopathic). If sowing seeds, allow four weeks after they have been been cut down. If planting seedlings, they can be planted straight away as they will not be affected.


FOR QUICK-GROWING GREEN MANURES IN SPRING AND SUMMER
Sow buckwheat, fenugreek, phacelia and mustard regularly throughout the spring and summer to fill in bare patches of earth, interplant between other crops and suppress weeds. We grow them until they are in flower, then cut them down, leaving their roots in the soil and using the stems on our compost. Or we grow them as a groundcover for a couple of weeks before hoeing them off at ground level.
TO BREAK UP COMPACTED SOILS
Sow fodder radish (in summer), phacelia (from spring to autumn) or alfalfa (for longer-term coverage) to penetrate compacted soils.
FOR LATE AUTUMN SOWING
Sow green manures to prevent damage from winter rains both washing away nutrients or compacting soil, to improve the structure of the soil, particularly to open up clay soils, and prevent weed germination. After we lift our dahlias in October, we sow phacelia which will survive a mild winter or forage rye to protect the soil through the winter. We also sow field beans over the top of our tulip bulbs in early spring.
In spring, the bulbs appear, we harvest them, then the field beans come up, we then cut down the field beans, leaving the roots in the soil as they fix nitrogen, and plant our cosmos through the remaining stubble. Forage rye is not attractive but is a good choice to withstand winter cold and wet and can be sown late in autumn.
FOR UNDER-SOWING
Sow yellow trefoil, winter tare (vetch) and white clover beneath or underneath other plants (eg roses or dahlias) to suppress weeds and feed the soil. All these fix nitrogen in the soil.
FOR LONGER COVERAGE
Sow alfalfa in summer as it is a frost hardy perennial so it will over-winter. You can grow it for 2 to 3 years, cutting it down regularly for your compost. It is good for dry soils and deep rooting. White clover is another good choice for a long-term green manure, for under-sowing, suppressing weeds and fixing nitrogen.
FOR BEES AND INSECTS
All green manures are good for insect life. We particularly like purple-flowered phacelia, white-flowered buckwheat and crimson clover.
FOR SOWING ON PATHS
A mix of three annual clovers – persian, egyptian and crimson – are good for suppressing weeds and fixing nitrogen between rows in the vegetable garden. You can mix this yourself or The Vineyard Fertility Building Mix is available from Cotswold Seeds.
FOR DIFFERENT SOIL TYPES
For dry soils – alfalfa and phacelia.
For light soils – buckwheat.
For clay soils – forage rye.
For heavy soils–field beans or winter tare (vetch).
For fertile soils – mustard.
For moist soils – fenugreek.
For sandy soils – crimson clover.

Soil is The Solution
Regenerative? Organic? Two themes explored in a film by Patagonia deep diving into soil and the integral role it plays within all of our lives.
Regenerative? Organic? Two themes explored in a film by Patagonia deep diving into soil and the integral role it plays within all of our lives.

Teas to Heal Your Soil and Plants
Teas for nutrients, weeds, pests and diseases. Learn from our tried and tested brews and make your own plant and soil remedies.
Teas for nutrients, weeds, pests and diseases. Learn from our tried and tested brews and make your own plant and soil remedies.
Teas are a quick and relatively easy way to start making meaningful improvements to your soil quality. For those just starting out however, take a quick look at our top tips before moving on to the recipies.
1) Use unchlorinated water as chlorine harms the microbes we're trying to protect. You can gather this either by collecting rainwater, attaching a carbon filter to your hose or by leaving a bucket of tap water outside overnight.
2) Use your teas straight away on a dull day or in the early morning or the evening to avoid bright sunshine as the UV light also kills microbes.
3) When applying your teas, we recommend spraying them on to the leaves and around the base of the plant with a watering can.
Now you're ready to start brewing!
COMPOST TEAS
WITHOUT A COMPOST TEA MAKER
A handful of Climate Compost inoculum or similar microbial compost
5 to 7 litres water
Watering can
Place compost into a watering can of water and ‘dynamise’ or stir so you create a vortex in the middle until the compost is mostly dissolved. The microbes are aerobic so by stirring this way you incorporate air into the process.
WITH A COMPOST TEA MAKER
1.5 litres Climate Compost inoculum or similar microbial compost
Muslin bag
Compost tea maker (we use a 40L Growing Solutions compost tea maker- see Resources)
40 litres water
Catalyst (food for microbes) we use Growing Solutions catalyst or a cup of seaweed
Fill the tea maker with water and catalyst. Place the muslin bag of compost into the basket. Brew for 24 hours.
Dilute 1:1 with water in a watering can.
NUTRIENT BOOSTING TEAS
We regularly use comfrey, nettle, and weeds for nutrient boosting teas. Follow the same recipe for each tea below.
WEED TEA
An old pillowcase or muslin bag
A large container of water
Diverse selection of weeds including roots, stems, and leaves. (Gather weeds after clearing beds, the more varieties the better, to add diverse nutrients such as calcium, iron, magnesium, phosphorus, copper, boron, manganese, and zinc.)
Leaves and stems of each plant – ideally when just about to flower as this is when they are most nutrient dense.
Place muslin bag of leaves into a bucket of water and leave for 3 weeks. Dilute approximately 1 part tea to 7 parts water in a watering can (it should be the colour of a weak cup of tea) and water onto your plants.
COMFREY TEA
Comfrey leaves (Bocking 14 variety). This is wonderful for all garden plants, especially for fruiting crops like cucumbers and tomatoes as it is rich in potash and trace elements, such as boron, which these plants need to flower and set fruit.
NETTLE TEA
This nutrient dense tea is good for plants and people – full of iron, magnesium, calcium, and potassium. Use for a nutrient boost or when plants are stressed from hot or cold weather or to stop leaves yellowing with chlorosis.
TEAS FOR HEALING FUNGAL ATTACK AND POWDERY MILDEW
GARLIC TEA
3 to 4 garlic cloves
1 to 2 litres water
Sieve or muslin
Soak chopped garlic in cold water for 2 days. Strain in a sieve or muslin and spray onto grey mould on plants (Botrytis) without diluting.
YARROW TEA TO DISCOURAGE MILDEW
50g yarrow flowers
5 litres water
Sieve or muslin
These sulphur-rich flowers discourage fungal infections and powdery mildew in ornamentals like roses and peonies. Add flowers to water and bring to the boil. Strain and dilute 1 cup in a watering can of water and apply. You can add nettle tea to this if you want to control insects.
MINT TEA TO DISCOURAGE PESTS
100g Mint leaves
1 litre water
Mint tea is useful for repelling pests and will deter flying insects such as aphids, whitefly and grape worm.
Soak leaves in tepid water outside for 3 to 4 days. Dilute 1 part tea to 4 parts water and apply with a watering can.

Soil Heroes
Get to know some of our favourite practitioners, pioneers and pin-ups from the world of soil.
Get to know some of our favourite practitioners, pioneers and pin-ups from the world of soil.


Insights from the World Living Soils Forum
For inspiration and highlights from the forum we’ve pulled keynotes from three sessions which look to the future of farming.
Highlights from the World Living Soils Forum
According to the World Living Soils Forum, less than 1% of reports on sustainability and environmentalism mention soil, the substance on which all life depends.
Given the rate of global land degradation, soil has become a silent crisis and one that overlooks not just the cost of intensive agricultural practices but the innovative solutions emerging to transform the sector.
The World Living Soils Forum was established in 2022 to put soil back on the agenda.
In October 2024, they hosted their 2nd conference in Arles, France, where over 500 farmers, scientists, business leaders, start-ups, and executives from the private and public sectors, came together to discuss regenerative practices, soil measurements, farming policies, certification, education and business management.
With over 70 sessions spanning two days, the forum showcases the breadth of those invested in the soil cause and the rewards of achieving landscape restoration at scale.
For inspiration and highlights from the forum we’ve pulled keynotes from three sessions which look to the future of farming.
1) Soil Health and Product Quality (Full session: 30 minutes)
In this panel, the connection between soil health, bionutrients and the taste of food is explored alongside practices to enhance soil vitality and nutrient-rich crops.
· Panellist, Dan Kittredge, coined the term “nutrient density” in 2008 when he was an organic farmer and here he talks about his journey to find if his organic produce was actually measurably better than that which was conventionally farmed.
· Researching 25 different crops from roots and leaves to fruits and grains, he went on to quantify variation in mineral, flavour and antioxidant compounds and deduced the causal factor was not soil type, climate zone or individual practices but the level of life in the soil.
· Now he is part of a group trying to determine a descriptive scale for nutrient quality in food and reward those with higher soil standards.
· A second panellist, Andrew Smith from the Rodale Institute, adds to the story having overseen the longest running side-by-side trial of organic vs conventional farming in North America.
· Starting in 1981, the data collected from these trials show vast differences in soil health, carbon stores and bioactive antioxidant compounds, but research on the impacts of food quality remains fairly young.
· His bottom line is that organic farming reduces chemical exposure to human beings and on that basis alone it’s the direction we need to go in.
· The final panellist, Hippolyte Courty is an expert in wine and coffee production. His point is a simple one: farming practices that nurture the earth produce more flavourful produce.
2) Innovations for Soil Health (Full session: 30 minutes)
In this session, a panel of soil innovators and investors discuss their approaches to improving soil health, farm commerciality and crop performance.
· Justine Lipuma, a soil microbiologist, works with farmers to produce microbial soil applications to enhance the natural symbiosis between plants and soil.
· She talks about how farmers can produce more food with less chemical fertiliser using these applications, with audits showing improvements to yield, quality and overall costs.
· Fabian Le Bourdiec started his professional life as a sleep scientist who studied electrical signals in the human brain.
· Now, he applies these signalling methods to plants and is working on ways to give agronomic indicators to farmers about what their plants need. E.g. signals on the water content of a crop can be used for irrigation management while other indicators can detect disease or assess food quality.
· Isabelle de Cremoux is a funds soil innovators.
· According to de Cremoux, the fact we have only mapped 15% of the soil microbiome makes investment in the sector, and support for farmers, likely to accelerate in the next 5-10 years.
3) From Pioneering to Mainstreaming Practices (Full Session: 30 minutes)
In this session, Patrick Holden, founder and CEO of the Sustainable Food Trust, introduces his model for moving sustainable and regenerative farming concepts into the mainstream.
· Holden is an organic dairy farmer based in west Wales, who has spent the past 5 decades working to make regenerative practices more commercial.
· This has included work with the Soil Association where he helped develop a certification standard for organic farming.
· Here, Holden speaks of the successes and challenges of this approach, including the alienation of conventional farmers and the dangers of creating niche food markets that only wealthy individuals can afford.
· Now, having founded the Sustainable Food Trust, his focus is on creating new revenue streams for farms based on their carbon capture, nutrient density and social impact.
· Farmers’ role in storytelling is also something Holden advocates for and he suggests regenerative farms should host open days, events or platforms that showcase their positive impacts, inviting funders and policymakers to show where more help is needed.
All talks from the World Living Soils Forum are free to watch online.
By Kate Balding

What We Can Learn from New Zealand’s Soil Star
How indigenous mythologies are strengthening models of regenerative farming in New Zealand.
New Zealand or, as it’s known in its native language, Aeoteroa, is a nation with traditionally strong ties to the earth.
The indigenous population of Māori have preserved records of the island landscape dating back more than 600 years and their cultural worldviews continue to shape contemporary land management narratives.
For some, integrating traditional worldviews into forward-focused agricultural policies may seem strange but, in New Zealand, blending mythology with farming works to strengthen wider regenerative and environmental trends.
One Māori belief that illustrates this idea is the story of Tupuānuku, or the “soil star”.
The Matariki cluster and the soil star
In Māori astronomy, Tupuānuku, is one of nine stars that sit in the Matariki cluster. This group rises together to mark each new year, and the stars are significant in Māori traditions because of their supposed influence over the natural world.
One star oversees the land or forests, others, air and water, frosts or rains. Tupuānuku is the star connected to anything within the soil. Tupuānuku is comprised of two words: ‘tupu’ which can mean ‘new shoot’ or ‘to grow’, and ‘nuku’, an abbreviation of ‘Papatūānuku’ (Earth mother). Tāne (atua of the forest) created the first woman, Hineahuone, from clay (her name means ‘earth-formed woman’) (Hutchings et al, 2018). Her source (clay) highlights the importance of soil and the connection between soil and people.
For Māoris, the soil has never just been a useful commodity or natural material but is a direct human ancestor that should be nurtured and cared for in relation to its continued influence over our wellbeing.
This connection is something you can also see in the Māori language, where the native word for “land”– whenua – is the same word used for “placenta”. The soil is thus both a source of human origin and nourishment.
Practical implications for soil health in New Zealand
In the last few decades, Māori traditions like the belief in Tupuānuku, are beginning to gain greater prominence within mainstream national land management plans, helping shape both environmental and academic interest in areas from Maramataka or “moon turning” (a Māori tradition where planting and harvesting pay heed to the phases of the moon) to soil vitality and microbial biodiversity.
As a result, production techniques like composting, crop rotation, and the reduction of chemical fertilisers, pesticides and herbicides are being strengthened with traditional knowledge and, in parallel, Māori horticulture has grown 300% in just 12 years.
Today, Māori enterprises own 30% of New Zealand’s beef market, 30% of the lamb market and 10% of the diary sector, and have proved in case studies across the country how traditional worldviews can play an important role in actively supporting the future of the farming industry.
By Kate Balding
Latest & Greatest
This is a block field
You can put any content in here.
Etiam porta sem malesuada magna mollis euismod. Vestibulum id ligula porta felis euismod semper. Maecenas sed diam eget risus varius blandit sit amet non magna. Vestibulum id ligula porta felis euismod semper.